
AI System That Publishes a WordPress Blog
Publishing blog posts used to be one of the most time-consuming parts of my workflow.
Every article required multiple manual steps:
- Copying content from a document
- Pasting it into WordPress
- Fixing headings
- Re-formatting paragraphs
- Re-inserting images
- Adding a table of contents
- Adjusting spacing and layout
Even a simple article could take 20–60 minutes to prepare before publishing.
When you publish frequently, that time adds up quickly.
So I decided to experiment with something different:
What if blog publishing could be fully automated?
This experiment led me to build a system that can take a document and publish it to my website in under a minute.
Table of Contents
- The Goal
- The Architecture of the System
- Step 1 — Writing the Article
- Step 3 — File Watcher Automation
- Step 4 — Converting DOCX to HTML
- Step 5 — HTML Cleanup and Normalization
- Section Title
- Step 7 — Token Optimization for AI Processing
- Step 8 — Fixing the Token Explosion
- Step 9 — AI Formatting via OpenClaw
- Step 10 — Validation Layer
- Step 11 — Publishing to WordPress
- Step 12 — Website Updates Automatically
- Why This Matters
- Final Thoughts
The Goal
The goal was simple:
Drop a document into a folder → automatically publish it to the website.
No manual formatting.
No copy-pasting into WordPress.
No editing the HTML.
Just write → upload → publish.
The Architecture of the System
The publishing pipeline uses a combination of automation, scripting, and AI processing.
The core components are:
- Google Docs / DOCX files (writing environment)
- Replit automation (execution environment)
- OpenClaw AI agent (content cleanup)
- WordPress REST API (CMS publishing)
- Headless website running on Replit
The workflow looks like this:
ai-wordpress-blog-automation-40-seconds ai-wordpress-blog-automation-40-seconds
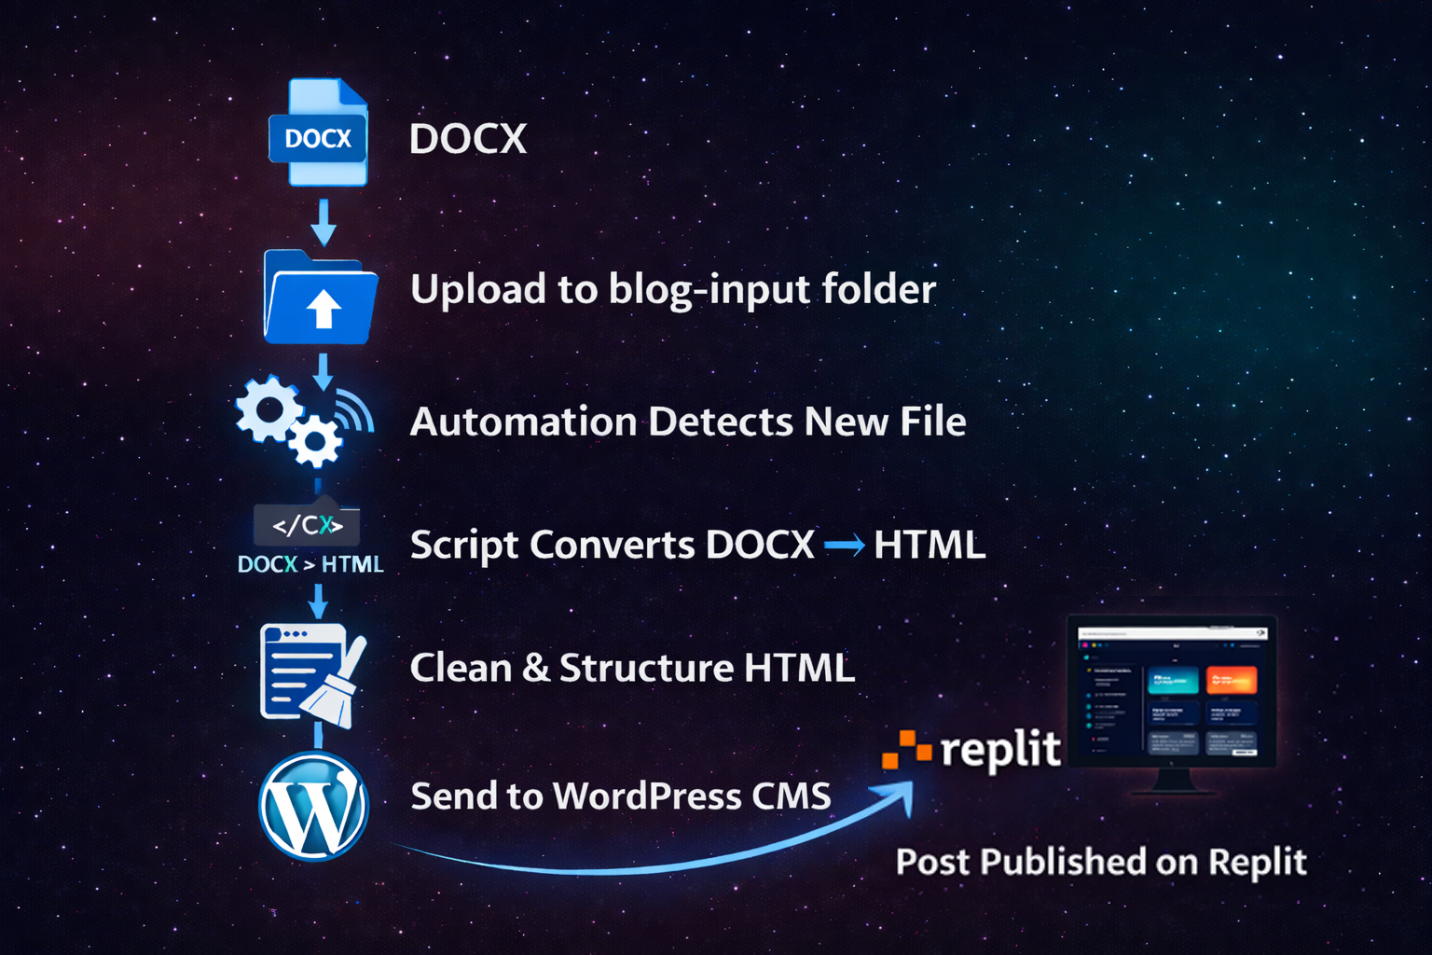
This entire process takes around 30–60 seconds.
Step 1 — Writing the Article
The system starts with a DOCX file.
The document contains two sections:
Metadata
The top section defines publishing settings:
Title: Example Blog Post
Meta Title: Example SEO Title
Meta Description: Example description
Slug: example-blog-post
Category: automation
Status: draft or publish
Article Content
Below the metadata, the actual article content begins.
Headings follow a simple structure:
Article Title
Section Heading
Paragraph text…
Another Section
More content…
Images can be inserted normally inside the document.
## Step 2 — Uploading the Document
Once the article is finished, the document is exported as:
.docx
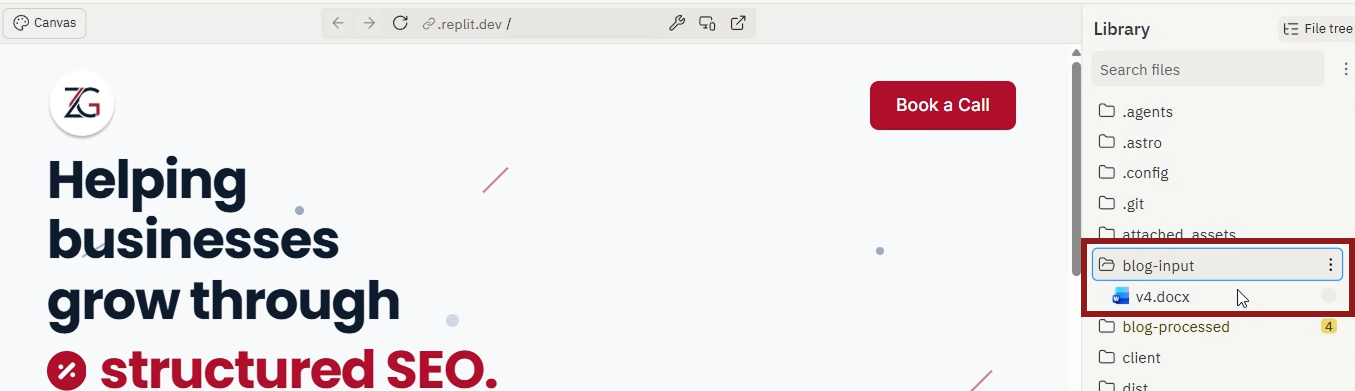
Then it is placed inside a folder in the project:
/blog-input
At this point, the automation system takes over.
Step 3 — File Watcher Automation
A background script continuously watches the folder.
Example logic:
watch blog-input
if new file detected
process document
publish post
move file to processed folder
This allows the system to run automatically without manual commands.
The moment a file appears, the workflow begins.
Step 4 — Converting DOCX to HTML
The script converts the DOCX file into HTML using a conversion library.
The output typically contains:
- Paragraphs
- Headings
- Images
- Lists
- formatting tags
However, DOCX conversions often include messy HTML such as:
<p><strong>## Heading</strong></p>
Or
<p>### Section Title</p>
This requires cleanup before publishing.
Step 5 — HTML Cleanup and Normalization
Before sending the content anywhere, the script performs several cleanup operations.
These include:
Heading normalization
Markdown-style headings are converted to HTML:
## Heading → <h2>Heading</h2>
### Heading → <h3>Heading</h3>
Wrapper removal
Sometimes headings appear inside other tags:
<p><strong>## Heading</strong></p>
These wrappers are removed so the final structure becomes:
<h2>Heading</h2>
Number prefix removal
DOCX exports often include numbering:
Section Title
The script strips these prefixes automatically.
Step 6 — Automatic Table of Contents Generation
One of the most useful features of the pipeline is automatic Table of Contents generation.
The script scans the cleaned HTML and extracts all:
<h2>
headings.
Each heading receives a unique ID:
<h2 id=”step-1-installation”>Step 1 — Installation</h2>
Then a Table of Contents block is generated:
<ul>
<li><a href=”#step-1-installation”>Step 1 — Installation</a></li>
<li><a href=”#step-2-setup”>Step 2 — Setup</a></li>
</ul>
This is inserted automatically after the introduction.
Step 7 — Token Optimization for AI Processing
Originally, the system used AI to clean formatting.
However, an unexpected problem appeared.
Images embedded in DOCX files were exported as base64 strings.
Example:
<img src=”data:image/png;base64,iVBORw0KGgoAAAANSUhEUgA…”>
Base64 images dramatically increase token size.
A single image can contain hundreds of thousands of characters.
As a result, early versions of the pipeline were sending:
~500,000 tokens per article
to the AI model.
This made the system extremely inefficient.
Step 8 — Fixing the Token Explosion
The solution was simple but effective.

Before sending HTML to the AI agent, the script removes base64 image data from the AI input.
Example transformation:
<img src=”data:image/png;base64,…”>
becomes:
<img src=””>
The original content is preserved separately.
The AI receives only text and structure, not image data.
This reduced the AI input dramatically.
Example result:
Before optimization:
~546,000 tokens
After optimization:
~2,700 tokens
That’s roughly 99.5% less processing cost.
Step 9 — AI Formatting via OpenClaw
Once optimized, the HTML is sent to an AI agent using an API endpoint.
The request looks like this:
task: clean_blog_html
content: <html content>
instructions: normalize headings, remove metadata
The AI returns:
- normalized HTML structure
- consistent heading hierarchy
- cleaned formatting
If the AI is unavailable, the script falls back to the original HTML automatically.
Step 10 — Validation Layer
Before publishing the post, the system validates the HTML structure.
Checks include:
- no empty headings
- headings contain IDs
- headings are not wrapped inside <p> tags
- no remaining markdown markers (##)
- table of contents exists
- no duplicate heading IDs
If any validation fails, publishing stops.
This prevents broken articles from being uploaded.
Step 11 — Publishing to WordPress

Once validation passes, the script sends the article to WordPress using the REST API.
Example request:
POST /wp-json/wp/v2/posts
The payload includes:
- title
- slug
- category
- post content
- status (draft or publish)
The post is immediately created inside the CMS.
Step 12 — Website Updates Automatically
The final step is handled by the website itself.
My site runs as a headless front-end.
The website fetches posts directly from WordPress.
Once the article exists in the CMS, the website automatically displays it.
No redeploy required.
Why This Matters
Automating repetitive workflows changes how content operations work.
Instead of spending time on formatting tasks, the focus shifts back to:
- writing
- research
- publishing strategy
Automation removes the friction between creating content and publishing it.
Final Thoughts
The biggest insight from this experiment wasn’t the automation itself.
It was realizing how many workflows we accept as “normal” even though they can be automated with relatively simple systems.
Sometimes a few scripts, an API, and an AI agent are enough to remove hours of manual work.
And once that happens, publishing becomes as simple as:
drop a file → publish.